
The Basics Concepts for Concealed Carry: Intermediate Development Skills: Stance ― Series 9
At this point, we should have a resident knowledge of our equipment, concealed carry position, concealed clothing, and the fundamentals of the draw sequence which we will review as follows.
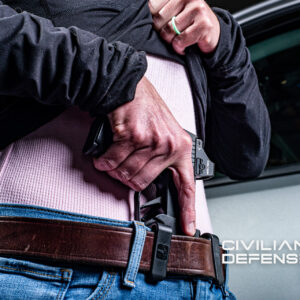
- You initiate the draw sequence by moving both hands simultaneously with all carry positions. Your first movement will depend on your carry position and your carry clothing. For example, if you are carrying strong side, IWB or OWB, wearing an opened front vest, jacket or light weight sports shirt, your dominant hand will sweep your concealed clothing away from your holstered firearm then you’re dominate hand will move to holstered firearm to establish the proper grip while your support hand simultaneously moves to the center of your chest. Your support hand should be opened, palm up, perpendicular to your chest, knuckles toward the ground and your thumb pointing toward the threat. If you are wearing a lightweight tee or polo shirt or a pullover garment for concealment, you will move both hands simultaneously with each hand securing your garment on each side of your holster. With both hands, pull the garment out and up then secure the firearm with your dominant hand with a proper grip while your support hand continues to hold the garment out of the way.
- When the proper grip is established, with your dominant hand, lift, and rotate your firearm toward the threat. The reason you immediately rotate the firearm toward the threat is, if necessary, you can engage the threat at this time from what is known as the retention position.
- If you do not engage from the retention position, then start your press out with your dominate hand until the firearm is slightly in front of your support hand, move your support hand toward the firearm, palm open pointed at approximately a 45-degree angle toward the ground. As your dominant hand continues, the press out, move your support hand to intersect the firearm, fill the empty space on the firearm grip with your support hand and establish the proper thumb over thumb grip with both hands.
- Continue your press out or punch out toward the threat while aligning the sights. Once you have completed your punch out movement and you have established proper sight alignment, engage the threat. I have found it best to focus your eyes on the spot where you want the point of impact to occur and as you complete the press out, your sights should inherently come up to where your eyes are focused, and your front sights should align properly with your eyes and the area for shot placement.
Now that you have conducted numerous dry drills of the draw sequence, reloads and malfunction drills, we will add one more element to the above review of the draw sequence and that is body mechanics or stance. In particular, the isosceles or combat stance (fighting stance) which is extensively used in military, law enforcement and competition communities. It has been reported that the fighting stance was developed in the military special forces (SF) community, others say it was developed in the civilian sector. At any rate, it made its way into these various communities as standard training. Certainly, there are other stances that are commonly used, however, after trying these other stances, I have determined the isosceles stance or combat stance is much more effective for multiple reasons. It became popular with LE and the military because it allows officers to defend themselves with their hands, baton, or firearm all from the same platform while utilizing their body armor to its fullest extent. It is also a great technique for civilian shooters because it provides a very stable platform that provides accuracy, recoil management, mobility and it provides partial application in various positions other than standing.
In the Fighting Stance, the shooter is square to the target. His feet are shoulder width or slightly wider and the strong side foot is slightly behind the support side foot. This offsetting of the feet provides additional support and balance and eliminates the forward to rear balance issue with exceptional options for quick mobility from one position to another.
To achieve this stance properly, the knees are slightly flexed to function as shock absorbers when moving in any direction. The shooter leans slightly forward bending at the waist and extends the arms straight out, aligning the sights at the focus location on the target. Your head is level to maintain balance, especially when moving. Additional benefits to this stance is that any firearm can be fired effectively from a stationary or moving position. When properly achieving this stance, you will notice a triangle formed from your shoulder forward to the gun and from your waist down to the ground forming a very stable platform to shoot from or to defend from. Although a case can be made when using a shotgun to possibly opt for the traditional shotgun stance due to the recoil and the individual deploying the shotgun but with the combat stance, there really isn’t a downside. It eliminates the common drawbacks of the other shooting positions and has been universally accepted with various shooting, law enforcement and military activities.
However, in a critically dynamic situation, you might find yourself in any number of positions including flat on your back or some other non-traditional shooting position. Therefore, it is beneficial to continue practice and master the fundamental skills which gives you confidence for managing the more complex situations.
In the next series, we will be discussing recoil management, follow through and range drills.
About the author
Lew Soccorsi brings over 32 years of experience as a firearms instructor, sharing his extensive knowledge and insights on firearms training and safety through the Civilian Defense Training Blog. Specializing in NRA Basic Pistol, Concealed Carry, and advanced tactical training, Lew offers expertise across various levels of Tactical Handgun and Carbine instruction. He holds certifications as an NRA Basic Pistol and Range Instructor, a Handgun Instructor through Sig Academy, and numerous tactical certifications, including a Master Gunsmith Certification. Lew’s depth of experience makes him an invaluable asset to our team.
 The Basics Concepts for Concealed Carry: Intermediate Development Skills: StanceApril 21, 2025 - 7:10 am
 The Basics | Concepts for Concealed Carry: Handgun Manipulation ― ReloadsApril 7, 2025 - 6:55 am


Leave a Reply
Want to join the discussion?Feel free to contribute!