
The Basics Concepts for CC: The Draw Sequence for Concealed Carry ― Series 6
The draw sequence can vary slightly depending on your carry position, but the fundaments will remain fixed with only slight modifications. The draw sequence is identified by four separate and deliberate movements:
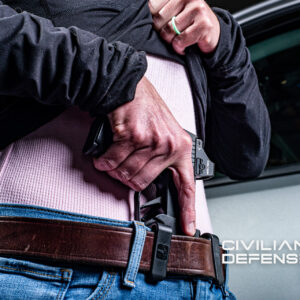
- You initiate the draw sequence by moving both hands simultaneously with all carry positions. Your first movement will depend on your carry position and your carry clothing. For example, if you are carrying strong side, IWB or OWB, wearing an opened front vest, jacket or light weight sports shirt, your dominant hand will sweep your concealed clothing away from your holstered firearm then you’re dominate hand will move to holstered firearm to establish the proper grip while your support hand simultaneously moves to the center of your chest. Your support hand should be opened, palm up, perpendicular to your chest, knuckles toward the ground and your thumb pointing toward the threat. If you are wearing a lightweight tee or polo shirt or a pullover garment for concealment, you will move both hands simultaneously with each hand securing your garment on each side of your holster. With both hands, pull the garment out and up then secure the firearm with your dominant hand with a proper grip while your support hand continues to hold the garment out of the way.
- When the proper grip is established, with your dominant hand, lift, and rotate your firearm toward the threat. The reason you immediately rotate the firearm toward the threat is, if necessary, you can engage the threat at this time from what is known as the retention position.
- If you do not engage from the retention position, then start your press out with your dominate hand until the firearm is slightly in front of your support hand, move your support hand toward the firearm, palm open pointed at approximately a 45-degree angle toward the ground. As your dominant hand continues, the press out, move your support hand to intersect the firearm, fill the empty space on the firearm grip with your support hand and establish the proper thumb over thumb grip with both hands.
- Continue your press out or punch out toward the threat while aligning the sights. Once you have completed your punch out movement and you have established proper sight alignment, engage the threat. I have found it best to focus your eyes on the spot where you want the point of impact to occur and as you complete the press out, your sights should inherently come up to where your eyes are focused, and your front sights should align properly with your eyes and the area for shot placement.
This methodology works well for IWB, OWB and with a slight adjustment, the Appendix position. It is imperative you practice the draw sequence first without concealment and you should practice the draw sequence with a timer. Initially, speed is of no importance in completing the draw sequence, rather, establishing the proper mechanics of the draw sequence should be your ultimate goal. However, using a timer is a valuable learning tool for several reasons; first, the timer initiates a signal indicating its time to act. It simulates a threat that requires a response which is to initiate the draw sequence. Timers can be set-up for a random delay start so you don’t get into a rhythm and anticipate the timer signal, and it is programmable to establish what is known as a PAR time. PAR time simply allows you to set the time you are trying to achieve for any specific drill and it really helps in aiding your progress; second, the timer provides a learning tool for you as you develop your skills you can record your progress with direct feedback as to how long it takes you to react and to accomplish your goal which is ultimately to protect yourself and others from imminent danger. As you progress with timer training, you might want to record your times at the beginning when you first start the drills (cold) and at the end when you have performed the drills numerous times. It will surprise you the difference there will be in cold starts and after a warm-up period. You should condition yourself to reduce the delta time between completing the drills cold and completing them after a warm-up period because if the time comes to defend yourself, you will most likely be completing the necessary sequences cold.
The following is a description of how I complete dry drills to practice the draw sequence as well as mag changes using various techniques for multiple circumstances.
When conducting these drills, you must maintain a safety posture at all times. First, remove the magazine from your handgun, rack the slide numerous times, lock the slide back and visually check the chamber to make sure it is, in fact, empty. Next, remove all loaded magazines from the room/area and have 3 empty magazines for the drills. You should have the proper belt, holster, and a spare mag carrier for these drills. I usually conduct these drills in front of a sofa or a bed looking out a window with a pre-determined spot on a tree or other object. I use the sofa or the bed because it is much more efficient in retrieving your mags after completing mag changes. Some use a light switch in the room as a focused target, but I feel more comfortable pointing the firearm outside to a designated target when I can. When you have confirmed your firearm and the room/area is completely safe, you can initiate the drills as follows.
- With an empty mag inserted into your firearm, slide forward, a spare mag in your mag carrier, gun holstered, and your timer set for a delayed start, you are now ready to start your drills.
- Press the start button on the timer, at the signal, draw and engage the pre-determined target you have chosen by focusing your eyes on the target and completing your punch out while obtaining proper sight alignment. Then with your support hand, tap the timer to stop the timing at that point. Its not an absolute time due to the delay in tapping the timer, but it gives you a ballpark time it took to complete the drill, and this time is accurate enough for practice and establishing the proper technique. Industry standards recommend 1.5 seconds minimum to draw and engage a target with one accurate round. This time was established by the definition of the 21-foot rule which we will talk about in future series.
- From this practice position, you can also perform mag changes which is why I do these drills in front of a sofa or bed. You can start with the firearm in the holster, empty mag in the firearm with the slide locked back. Draw and engage your determined target, then retreat the firearm to your immediate workspace high and close to your body, while dumping the spent mag on the retreat movement and then refreshing the firearm with a new mag from your carrier and press out to the target. This drill is a simulation representing the fact that you have depleted the rounds in your magazine and require a fresh mag. You can practice malfunction drills using this techniques in a similar fashion.
Up to this point in our series, we have not discussed malfunctions or mag changes. In Series 7, we will discuss these issues to enhance your development.
About the author
Lew Soccorsi brings over 32 years of experience as a firearms instructor, sharing his extensive knowledge and insights on firearms training and safety through the Civilian Defense Training Blog. Specializing in NRA Basic Pistol, Concealed Carry, and advanced tactical training, Lew offers expertise across various levels of Tactical Handgun and Carbine instruction. He holds certifications as an NRA Basic Pistol and Range Instructor, a Handgun Instructor through Sig Academy, and numerous tactical certifications, including a Master Gunsmith Certification. Lew’s depth of experience makes him an invaluable asset to our team.
 The Basics Concepts for Concealed Carry: Intermediate Development Skills: StanceApril 21, 2025 - 7:10 am
 The Basics | Concepts for Concealed Carry: Handgun Manipulation ― ReloadsApril 7, 2025 - 6:55 am


Leave a Reply
Want to join the discussion?Feel free to contribute!